The Path to Property Ownership: Understanding the Real Estate Closing Process
The real estate closing process is the final stage of a property transaction where ownership officially transfers from seller to buyer. For those seeking a quick overview:
What is the Real Estate Closing Process?
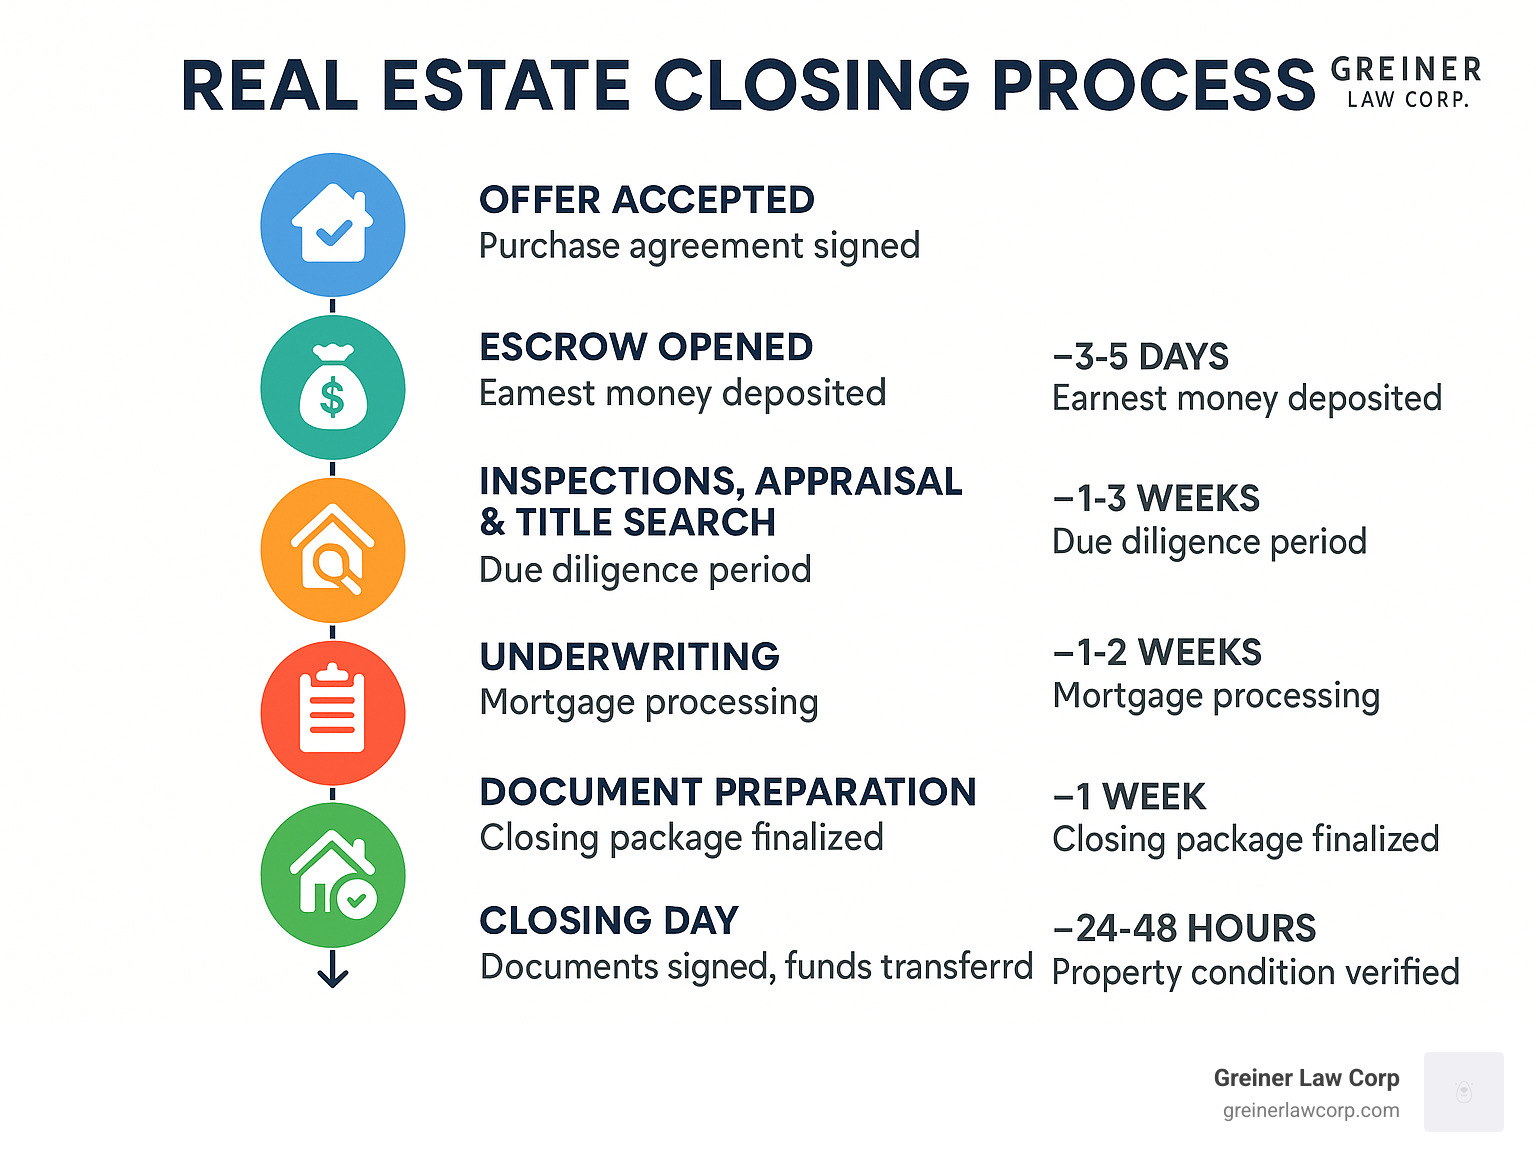
1. Contract acceptance – Purchase agreement is signed
2. Escrow opened – Earnest money deposited (typically 1-3% of purchase price)
3. Due diligence – Home inspection, appraisal, and title search conducted
4. Mortgage processing – Loan application finalized and approved
5. Final walkthrough – Property condition verified 24-48 hours before closing
6. Closing meeting – Documents signed, funds transferred, deed delivered
7. Post-closing – Deed recorded with county, funds disbursed
The closing process typically takes 30-45 days for financed purchases (can be faster for cash deals) and includes closing costs ranging from 3-6% of the home’s purchase price.
Buying a home represents one of the largest and most significant transactions most people will make in their lifetime. While exciting, the closing process can feel overwhelming with its legal documents, financial requirements, and procedural steps. Understanding what happens between having your offer accepted and receiving the keys helps ensure a smoother transaction.
The closing process serves as a safeguard for all parties involved. It ensures the property has a clear title, confirms financing is secure, verifies the property’s condition meets expectations, and properly documents the legal transfer of ownership. Each step builds confidence that when you finally receive those keys, you’re truly becoming the rightful owner of your new property.
I’m David Greiner, Esq., with extensive experience guiding clients through the real estate closing process as part of my transactional law practice, where I’ve helped countless businesses and individuals steer real estate transactions with a focus on achievement rather than billable hours.
Simple guide to real estate closing process terms:
– contract for land purchase
– contract for sale of real estate
– property settlement agreement
1. Real Estate Closing Process at a Glance
The real estate closing process is that magical moment when a property officially changes hands. Think of it as the grand finale of your home-buying journey – the point where the seller hands over the deed and you become the proud new owner of your dream home.
Most people are surprised to learn that closing isn’t just a single meeting but rather a series of steps that typically unfolds over about 44 days for financed purchases, according to ICE Mortgage Technology. If you’re lucky enough to be paying cash, you might zip through in as little as 30 days.
Your closing trip begins the moment your offer is accepted and that purchase agreement is signed. From there, it’s a bit like a relay race with various professionals passing the baton until you finally get those keys in your hand.
During these weeks, several important things happen behind the scenes:
Your contingencies (those safety nets in your contract) need to be addressed – like making sure the home inspection doesn’t reveal any scary surprises and your financing comes through as planned.
Your mortgage lender (if you’re not paying cash) works through their approval process, checking everything from your credit score to the property’s value.
Meanwhile, title professionals are digging through public records like detectives, making sure the seller actually has the right to sell you the property and that there aren’t any surprise liens or claims lurking in the shadows.
“I like to tell my clients that the real estate closing process is really just a series of safety checks,” says David Greiner of Greiner Law Corp. “Each step ensures that what you thought you were buying is actually what you’re getting – both in terms of the property itself and the financial arrangement.”
The Consumer Financial Protection Bureau has your back during this process too. They’ve put regulations in place to protect buyers, including requiring lenders to give you a Closing Disclosure at least three business days before your closing date. This important document shows your final loan terms and costs, giving you time to spot any surprises before signing day.
For those who want to dive deeper into the mortgage side of things, the CFPB offers excellent resources that break down the process in consumer-friendly terms. You can learn more about the mortgage closing process from the CFPB.
While the real estate closing process might seem complex with its many moving parts, each step serves to protect your investment and ensure a smooth transfer of ownership. And when you finally get those keys? Well, that feeling makes all the paperwork worthwhile.
2. Key Players at the Closing Table
The real estate closing process brings together several key professionals who work in harmony to ensure your property transaction goes smoothly. Understanding who’s who at the closing table helps you steer this important day with confidence.

Think of your closing as a carefully orchestrated performance where each person plays a vital role. You’ll likely meet the buyer and seller—the stars of the show—who are there to complete the property transfer. The buyer receives the deed and provides payment, while the seller transfers ownership and walks away with proceeds from the sale.
Your real estate agents typically attend as well, serving as your advocates throughout the final steps. They’re there to answer last-minute questions, coordinate details, and ensure everything goes according to plan. If you’re financing your purchase, a representative from your mortgage company might join to guide you through the loan documents.
At the center of the action is the escrow agent or officer, the neutral party who handles all the money involved. They collect your down payment and closing costs, receive loan funds from the lender, and distribute payments to the seller and other service providers. They’re essentially the financial traffic controller of your transaction.
The title company representative plays a crucial behind-the-scenes role before closing day arrives. They’ve already conducted the title search to verify the seller has the right to transfer ownership and that no unexpected liens exist. At closing, they issue title insurance policies that protect your investment. Often, the escrow officer and title representative are one and the same person.
“Having a real estate attorney present at closing can be invaluable,” notes David Greiner. “Especially when dealing with complex transactions or unique property situations, an attorney can explain legal documents, address last-minute issues, and ensure your rights are protected.”
In some eastern states, attorneys are legally required to conduct real estate closings. Even when not required, many buyers and sellers choose to have legal representation for peace of mind.
Don’t be surprised to see a notary public at the table as well. They verify everyone’s identity and witness the signing of important documents. In some regions, mobile notaries even conduct closings at locations convenient for all parties.
Occasionally, an insurance representative might attend to provide homeowner’s insurance policies that lenders require before closing can be completed.
For more information about real estate attorney services in Riverside, visit our website
Buyer vs. Seller Duties in the Real Estate Closing Process
During the real estate closing process, both sides of the transaction have important responsibilities that help ensure a successful closing day.
As a buyer, you’ll need to complete your mortgage application with all supporting documentation, schedule and attend the home inspection, and carefully review the title commitment. You’ll also secure homeowner’s insurance, conduct a final walkthrough shortly before closing, bring certified funds or arrange a wire transfer for closing costs, sign numerous loan and closing documents, and set up utilities in your name.
Sellers have their own checklist: providing access for inspections and appraisal, completing agreed-upon repairs, resolving any title issues or liens, gathering home documents like warranties and manuals, removing personal property not included in the sale, leaving the home in “broom clean” condition, signing the deed and transfer documents, and providing all keys, garage door openers, and access codes.
“The handoff of keys is often the most emotional moment in the real estate closing process,” says David Greiner. “It represents the physical transfer of possession and the culmination of what is often months of preparation and anticipation.”
This exchange of keys transforms a house into your home—the tangible symbol that the property is now truly yours. It’s the moment when all the paperwork, negotiations, and planning culminate in the achievement of homeownership.
3. Step-by-Step Timeline of the Real Estate Closing Process
The real estate closing process unfolds like a well-orchestrated dance, with each step building upon the last. Understanding this timeline helps you anticipate what’s coming and prepare accordingly, whether you’re a first-time homebuyer or a seasoned seller.
Day 1: Offer Accepted
The excitement begins! With signatures on the purchase agreement, your journey officially starts. This is when you’ll prepare your earnest money check—typically 1-3% of the purchase price—showing the seller you’re serious about the transaction. If you’re financing the purchase, now’s the time to submit that loan application and get the ball rolling.
Days 2-3: Escrow Opened
Your earnest money finds its temporary home with the escrow or title company, acting as a neutral third party. They’ll begin preliminary title work and create escrow instructions based on the terms you and the seller agreed upon in the purchase agreement. Think of escrow as the safe harbor where your transaction develops.
Days 3-10: Inspections Period
Now comes the detective work. Your home inspector will thoroughly examine the property, looking for everything from foundation issues to faulty light switches. You might also need specialized inspections for specific concerns like the roof, sewer lines, or pest problems. Once you receive the reports, you’ll review the findings and negotiate any necessary repairs with the seller.
Days 10-20: Appraisal and Title Work
Your lender orders an appraisal to confirm the property’s value matches your purchase price. Meanwhile, the title company conducts their search to ensure the seller can legally transfer ownership and that no unexpected liens or claims exist. You might also need a property survey, depending on your location and lender requirements.
Days 20-30: Underwriting
Behind the scenes, your lender’s underwriting team reviews all documentation with a fine-tooth comb. They may request additional information or clarification on certain items. During this time, you’ll secure homeowner’s insurance, and any title issues finded earlier will be resolved. This phase can sometimes feel quiet, but there’s plenty happening.
Days 30-35: Preparation for Closing
The homestretch begins when you receive “clear to close” from your lender—the green light that your loan is approved. You’ll receive your Closing Disclosure at least three business days before closing (a legal requirement), giving you time to review final numbers. Your closing appointment gets scheduled, and final loan documents are prepared.
Day Before Closing: Final Walkthrough
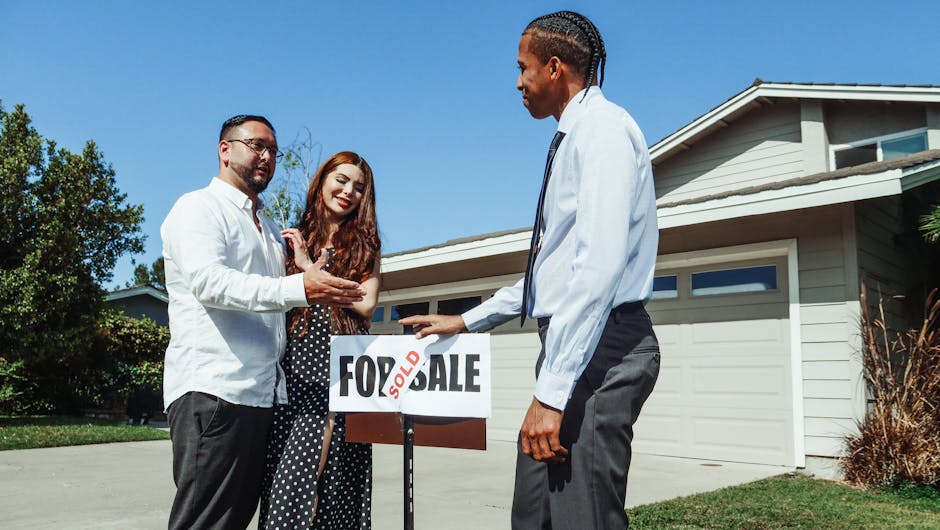
This is your last chance to verify the property’s condition before it becomes yours. During the walkthrough, you’ll confirm all agreed-upon repairs were completed and that the property is in the expected condition. If you’re purchasing a home where the seller is moving out, you’ll verify the property is vacant (unless otherwise arranged) and that all items included in the sale remain.
Closing Day
The day you’ve been waiting for! All parties sign the necessary documents—and there will be many. You’ll provide the funds needed to close, either via wire transfer or certified check. The lender funds the loan, and the title company prepares the deed and mortgage documents for recording. While some closings take just an hour, be prepared to spend a few hours reviewing and signing everything.
Post-Closing (1-3 Days)
The final pieces fall into place as documents are recorded with the county, officially transferring ownership. Funds are disbursed to the seller and other parties like agents and attorneys. The most satisfying moment comes when keys are transferred to you as the new owner. Congratulations—you’ve made it through the real estate closing process!
“The timeline can vary based on local practices, financing requirements, and any issues that arise during the process,” explains David Greiner. “Cash transactions typically close faster because they eliminate the mortgage approval process, which is often the most time-consuming element.”
Learn more about real estate contracts
Keeping Your Real Estate Closing Process on Schedule
Even the smoothest transactions benefit from active management. Here’s how to keep your closing on track:
Open Communication makes all the difference in the real estate closing process. Establish a single point of contact for questions and updates, set clear expectations about response times (ideally within 24 hours), and stick with a consistent communication method everyone agrees on.
Document Checklists prevent paperwork problems. Create a master list of everything you need to provide, track what’s been submitted and approved, and set calendar reminders for approaching deadlines. This simple tool can prevent the most common closing delays.
Quick Responses maintain momentum. When your lender or agent requests information, try to respond the same day. Address issues immediately rather than letting them pile up, and have backup plans ready for common roadblocks like inspection issues or appraisal concerns.
Interest Rate Lock Management protects your financing terms. Understand exactly how long your rate is locked (typically 30, 45, or 60 days), monitor these dates carefully, and discuss extension options with your lender if delays seem likely.
Contingency Deadline Tracking keeps your contract on solid ground. Mark all contractual deadlines on your calendar, build in buffer time whenever possible, and communicate proactively as important dates approach.
“One of the most common causes of delays in the real estate closing process is documentation issues,” notes David Greiner. “Missing or incomplete paperwork can set back your timeline by days or even weeks. Creating a comprehensive checklist and staying on top of deadlines is crucial.”
4. Essential Documents You’ll Review and Sign
The paperwork mountain of the real estate closing process often surprises first-time homebuyers. But don’t worry – understanding these key documents will help you steer closing day with confidence and maybe even a little less hand cramping!
Loan Documents (for financed purchases)
When you’re borrowing money to buy your dream home, you’ll encounter several crucial financing documents.
Your Closing Disclosure is like the final answer key to your mortgage puzzle. This five-page form breaks down your loan terms, monthly payments, and exactly what you’ll pay at closing. Lenders must provide this at least three business days before closing – this isn’t just courtesy, it’s federal law! Take time to compare it with your initial Loan Estimate to spot any unexpected changes.
The Promissory Note is essentially your formal “I promise to pay” document. This legally binding paper details your loan amount, interest rate, when payments are due, and what happens if you miss payments. While it might not be the most exciting reading, it’s one of the most important financial commitments you’ll make.
Your Deed of Trust or Mortgage (depending on your state) is what secures your loan using the property as collateral. This document gives your lender the right to foreclose if payments aren’t made. Think of it as the “teeth” that give your promissory note its bite.
Transfer Documents
The Deed is the star of the show – this legal document actually transfers ownership from seller to buyer. The type of deed varies by state (warranty deed, grant deed, quitclaim deed), but all contain the legal description of your property and must be recorded with the county to make the transfer official.
“The deed recording is really the moment when ownership legally changes hands,” explains David Greiner. “Until that document is recorded at the county, the transfer isn’t complete.”
The Bill of Sale handles all the “stuff” that comes with the house – appliances, fixtures, and other personal property items included in your purchase. It’s essentially an itemized receipt for everything besides the actual real estate.
Title Documents
Your Title Commitment transitions into your Title Insurance Policy after closing. This vital protection shields you from ownership claims and title defects that might emerge in the future. Think of it as insurance against someone showing up years later claiming they actually own your kitchen!
Various Affidavits and Declarations need signing too, including the seller’s affidavit about property condition and title issues, non-foreign status affidavit (FIRPTA), and state-specific transfer declarations. These sworn statements help prevent fraud and ensure proper tax treatment.
Other Essential Documents
Escrow Instructions tell the escrow agent exactly how to handle your funds and documents. They specify all conditions that must be met before closing can officially occur.
Your lender will require Homeowners Insurance Proof before funding your loan. This evidence shows you’ve protected their (and your) investment with adequate insurance coverage.
The Closing Statement provides an itemized accounting of every dollar involved in your transaction. It shows debits and credits for both buyer and seller and details exactly where all the money is going.
“The paperwork can feel overwhelming, but remember – each document serves a specific purpose in protecting you and ensuring a clean transfer,” says David Greiner. “Never hesitate to ask questions about anything you don’t understand before signing. These documents will impact your financial and legal situation for years to come.”
Learn more about legal fees for real estate closing
5. Escrow, Title Search & Insurance Demystified
The real estate closing process includes some components that might seem mysterious if you’re new to property transactions. Let’s shed some light on these important protections that work together to ensure your purchase goes smoothly.
Escrow Account
Think of an escrow account as a secure financial middleman in your transaction. This neutral third-party holding account (managed by an escrow company, title company, or attorney) keeps everyone honest and provides peace of mind during your property purchase.
When you make an offer on a home and it’s accepted, you’ll typically deposit earnest money into escrow—showing the seller you’re serious about buying. This money remains safely held until closing day, when it’s applied toward your down payment.
“Escrow acts as the trusted referee in your transaction,” explains David Greiner. “No one gets paid until everyone fulfills their obligations, which protects both buyers and sellers from potential mishaps or disputes.”
The beauty of escrow is its simplicity: your money stays secure while all the moving pieces of your transaction fall into place. Only when all conditions of the sale are met does the escrow officer disburse funds to the appropriate parties.
Title Search
Before you buy a home, you need to know if the seller truly owns it free and clear. That’s where a title search comes in—a deep dive into the property’s history through public records.
During this investigation, title professionals examine:
– Property deeds and previous ownership transfers
– Existing mortgages, liens, or judgments
– Property tax records and assessments
– Easements that might affect property use
– Restrictive covenants or homeowners association rules
This research answers crucial questions: Can the seller legally transfer ownership? Are there any claims against the property? Will you face restrictions on how you can use the land? Finding issues early gives everyone time to resolve them before closing.
“The title search is like a background check for your property,” David Greiner notes. “It reveals the property’s legal history and any potential complications that might affect your ownership rights.”
Title Insurance
Once the title search is complete, it’s time to protect your investment with title insurance—a unique form of protection that differs from most insurance policies.
While most insurance (like auto or health) protects against future events, title insurance guards against problems from the past that might not surface until after you own the property. These hidden issues could include forged documents, unfinded heirs claiming ownership, or mistakes in public records.
There are two types of policies to understand:
Lender’s Policy is required if you’re getting a mortgage. It protects only your lender’s interest in the property, with coverage that decreases as you pay down your loan. You’ll typically pay for this as part of your closing costs.
Owner’s Policy protects your equity in the home. While optional, it’s highly recommended since it shields your investment for as long as you (and your heirs) own the property. You pay just once at closing, and the coverage continues for decades.
“Title insurance is like buying peace of mind with a one-time payment,” says David Greiner. “For the price of a nice dinner out each month for a year, you’re protecting what’s likely the largest investment of your life for as long as you own it.”
The premium varies based on your property’s value, but the protection is invaluable against issues like boundary disputes, undisclosed liens, or recording errors that could threaten your ownership rights.
Many homebuyers receive a discount when purchasing both policies together, making comprehensive protection more affordable. Your title company or attorney can explain the specific coverage options available in your area.
Learn more about title insurance from the American Land Title Association
For information about real estate purchase agreements, visit our website
6. Crunching the Numbers: Closing Costs & Who Pays What
The financial side of the real estate closing process often catches both buyers and sellers by surprise. Those mysterious “closing costs” typically add up to between 3% and 6% of your home’s purchase price—not a small sum when you’re talking about California real estate!
Let’s break down who pays for what, so you can budget accordingly and avoid any last-minute financial shocks.
Typical Buyer Closing Costs
When you’re buying a home, your wallet takes the bigger hit at closing. The biggest chunks come from loan-related fees and services needed to protect your investment.
Your lender will charge origination fees (usually 0.5-1% of your loan amount), plus application fees ($300-$500), credit report fees ($25-$50), and underwriting fees ($300-$900). If you want to lock in your interest rate, that might cost another 0-1% of your loan amount.
Then come the third-party services. You’ll need an appraisal ($300-$500), home inspection ($300-$500), and possibly a pest inspection ($75-$150). In some areas, a property survey ($400-$600) is required too.
Title services are another major expense. These include title search fees ($200-$400), lender’s title insurance (which protects your mortgage company), and optional owner’s title insurance (which protects you). Don’t forget the settlement fee ($500-$1,000) for handling all the paperwork.
Government fees can’t be avoided either—recording fees ($25-$250) make your ownership official, and transfer taxes vary widely depending on your location.
Finally, prepare for prepaid items: homeowner’s insurance (often a full year upfront), property tax reserves (2-6 months), mortgage interest from closing until your first payment, and any applicable HOA fees.
Typical Seller Closing Costs
Sellers, you don’t escape the closing cost conversation either! Your biggest expense is typically the real estate commission—usually 5-6% of the sale price, split between the listing and buyer’s agents.
Depending on your location, you might also pay for the owner’s title insurance policy, title search fees, or split the settlement fee with the buyer.
Transfer taxes can be substantial in some areas, including documentary transfer tax and state transfer tax. Other potential costs include home warranties offered to entice buyers, property tax prorations, HOA transfer fees, recording fees for releasing any liens, and attorney fees if applicable.

Negotiating Closing Costs
The good news? Many closing costs aren’t set in stone. Smart negotiation can significantly reduce your out-of-pocket expenses.
Seller concessions are a common strategy where the seller contributes toward the buyer’s closing costs. Limits vary by loan type—conventional loans allow 3-9% (depending on down payment), FHA loans permit up to 6%, and VA loans cap at 4% of the purchase price.
If you’re buying, consider asking your lender about lender credits. You might accept a slightly higher interest rate in exchange for money toward closing costs—a worthwhile trade-off if you’re short on cash upfront.
Don’t forget to shop around for services like title insurance, home inspection, and homeowner’s insurance. Prices can vary significantly between providers, and even small savings add up.
“The allocation of closing costs is one of the most negotiable parts of a real estate transaction,” notes David Greiner. “In California’s competitive markets, we often see buyers and sellers using closing cost allocations strategically to make deals happen. Just make sure everything is clearly spelled out in your purchase agreement to avoid misunderstandings when it’s time to sign.”
The real estate closing process becomes much less stressful when you understand the financial commitments involved. Planning ahead for these expenses ensures you’ll be ready when the big day arrives.
For real estate contract templates, visit our website
7. Common Roadblocks and How to Avoid Them
Even the most carefully planned home purchases can hit unexpected bumps in the real estate closing process. Knowing what might go wrong helps you prepare for potential hiccups and minimize stress when they occur.
Low Appraisal
When your dream home’s appraised value comes in below the agreed purchase price, it creates an immediate financing gap. Lenders won’t provide a mortgage for more than the property’s appraised value, leaving you with several options to bridge this gap.
You might choose to pay the difference in cash, which works well if you have extra funds available. Alternatively, the seller might agree to reduce the price to match the appraisal—especially likely in a buyer’s market. Many transactions find middle ground with both parties compromising on price.
“In hot markets, we often see appraisals struggling to keep pace with rapidly rising values,” explains David Greiner. “Buyers can protect themselves by researching comparable sales thoroughly before making offers and including appraisal contingencies in their contracts.”
Credit Changes
Your financial profile needs to remain consistent from pre-approval through closing day. Even small changes to your credit—like opening a new credit card for furniture or financing a car for your new garage—can derail your mortgage approval at the last minute.
If your credit does change, address the issue immediately with your lender. Sometimes providing explanation letters for legitimate changes can help. For unexpected problems, rapid rescoring services might improve your credit profile quickly enough to save the deal.
The best prevention? Freeze all major financial activity during the real estate closing process. Hold off on job changes, large purchases, or new credit applications until after you’ve received your keys.
Unmet Contingencies
Contingencies protect buyers by allowing them to back out under specific circumstances, but they can also become sticking points when issues arise. Home inspection findings often lead to tough negotiations about repairs or price adjustments.
When contingency issues emerge, open communication becomes crucial. Both parties need clarity about expectations and options. Sometimes extending contingency periods provides needed breathing room to resolve problems, while other situations call for creative compromises.
Title Defects
Nothing throws cold water on a closing like finding someone else might have a claim to your property. Title searches sometimes uncover liens, judgments, boundary disputes, or even previously unknown heirs with potential claims.
“I once had a client find that a contractor had filed a mechanics lien against their soon-to-be home for work that was supposedly paid for years earlier,” shares David Greiner. “We had to track down the now-retired contractor in another state to get a release before closing could proceed.”
Most title issues can be resolved, though they often require time and legal assistance. Sellers can prevent delays by conducting preliminary title searches before listing, while buyers should carefully review title commitments and ask questions about any exceptions.
Repair Disputes
When inspection reports reveal issues, repair negotiations can quickly become contentious. Disagreements about the scope, quality, or necessity of repairs can derail an otherwise smooth transaction.
Clear communication helps prevent these disputes. Be specific in repair requests, consider getting professional estimates for major issues, and always verify repairs before closing. Sometimes substituting price adjustments for repairs simplifies the process and avoids delays.
Wire Fraud
Perhaps the most devastating closing issue today is wire fraud. Criminals hack into email accounts, monitor transaction communications, and then send fraudulent wire instructions that look legitimate but direct your funds to their accounts instead.
“Wire fraud is not just common—it’s epidemic,” warns David Greiner. “I’ve seen buyers lose their entire down payment because they didn’t verify wire instructions through a trusted phone number. Once that money is gone, it’s nearly impossible to recover.”
Protect yourself by verbally confirming all wire instructions using phone numbers you’ve independently verified—never use contact information provided in the same email as the wire instructions. Consider making a small test transfer first, and always confirm receipt immediately after sending funds.
For real estate legal advice in California, visit our website
Fraud-Proofing Your Real Estate Closing Process
The real estate closing process involves transferring large sums of money, making it an attractive target for fraudsters. Taking proactive steps to protect yourself is essential.
Secure your communications by using encrypted email when possible and avoiding sending sensitive financial information electronically. Be particularly vigilant about email security—criminals often use addresses that look legitimate but contain subtle misspellings.
Build a verified contact list at the beginning of your transaction. Independently confirm phone numbers for your agent, lender, escrow officer, and attorney, then use these trusted contacts to verify any financial instructions you receive.
Follow CFPB guidelines for protecting yourself during real estate transactions. The Consumer Financial Protection Bureau recommends never sending financial information via email and being watchful for phishing attempts throughout the transaction.
Implement dual authentication by requiring verbal confirmation of any financial instructions. Never rely solely on email for sensitive financial matters. As David Greiner notes, “Legitimate title companies and attorneys rarely change wiring instructions mid-transaction. If you receive such a change, consider it a major red flag until proven otherwise.”
By staying alert to these common roadblocks and taking preventive measures, you can steer the closing process with greater confidence and security. While no transaction is completely immune to problems, preparation and vigilance significantly reduce your risk of derailment on the path to homeownership.
8. Closing Day & Post-Closing Checklist
The big day has finally arrived! Closing day represents the exciting finale of your real estate closing process – that magical moment when you’ll sign documents, transfer funds, and officially become a homeowner. Let’s walk through what to expect and what happens after you’ve signed on all those dotted lines.
Closing Day Essentials
Picture this: you walk into the closing office, perhaps a little nervous but mostly excited. The table is set with stacks of papers awaiting your signature. But don’t worry – you’re prepared!
Before heading to your closing appointment, make sure you have your valid government-issued photo ID tucked safely in your wallet. Whether it’s your driver’s license or passport, you’ll need this to verify your identity. If you’re not wiring funds, bring a certified or cashier’s check for your closing costs – personal checks typically aren’t accepted for large amounts.
Those who’ve already sent a wire transfer should bring proof that the funds were sent. It’s also smart to bring a copy of your Closing Disclosure, your homeowner’s insurance policy, and any other documents your lender or closing agent specifically requested.
“Don’t forget your personal checkbook,” advises David Greiner. “Sometimes there are last-minute adjustments of a few hundred dollars, and having a checkbook saves you from having to find an ATM.”
Most closing appointments take between one and two hours. You’ll sign numerous documents – often 50 or more for financed purchases. Don’t feel rushed! The closing agent should explain each document, and this is your opportunity to ask questions about anything you don’t understand.

When all documents are signed and funds distributed, you’ll experience one of the most satisfying moments of the entire real estate closing process – receiving the keys to your new home. Depending on local practices, you might get keys immediately or after the deed is recorded with the county (which could be later that day or the next business day).
Post-Closing Tasks
Once the ink is dry and the keys are in your hand, you’re a homeowner – congratulations! But your journey isn’t quite complete. There are several important tasks to tackle in the days and weeks that follow.
First things first: security. Change the locks and security codes as soon as possible. You never know who might have copies of the old keys. Next, make sure utilities are transferred to your name so you’re not left in the dark (literally!) when you move in.
Within your first week, update your address with the postal service, DMV, financial institutions, insurance providers, and your employer. This seemingly mundane task prevents headaches down the road when important mail goes missing.
“Many new homeowners don’t realize the importance of properly storing their closing documents,” says David Greiner. “These papers represent the largest investment most people will ever make.”
Store your closing documents in a safe place – ideally a fireproof box or safe deposit box. Keep all documents for at least seven years, but store your deed, title policy, and survey indefinitely. These documents are essentially your proof of ownership. Consider making digital backups too, and include these documents in your estate planning file.
If your state offers homestead exemptions (property tax breaks for primary residences), be sure to file for this benefit within 30 days of closing. While you’re updating your information, register to vote at your new address and review your property tax assessment to ensure it’s accurate.
Take time to meet your neighbors and join community groups – this helps you build connections in your new neighborhood and can be invaluable when you need recommendations for local services.
As you settle in, create maintenance schedules based on recommendations from your home inspection report. Locate important features like water and gas shutoffs, change HVAC filters, and test smoke and carbon monoxide detectors.
“The deed recording is particularly important,” notes David Greiner. “This is when your ownership becomes part of the public record. While the closing agent typically handles this, it’s wise to verify that it’s been completed and to obtain a copy of the recorded deed for your records.”
With these steps complete, you can truly relax and enjoy your new home, knowing you’ve successfully steerd the real estate closing process from start to finish.
Frequently Asked Questions about the Real Estate Closing Process
How long does the real estate closing process take?
The real estate closing process typically takes between 30-45 days for most financed home purchases. If you’re lucky enough to be making a cash purchase, you might close much faster—sometimes in as little as two to three weeks.
Every transaction has its own rhythm and timeline, influenced by several factors. Conventional loans usually move faster than government-backed options like FHA or VA loans. The property type matters too—a straightforward single-family home purchase generally closes more quickly than a complex commercial property or new construction.
“Here in California, I’ve seen motivated buyers with strong pre-approvals close in as little as 21 days,” shares David Greiner. “But I always encourage clients to build in some buffer time. Market conditions, appraisal backlogs, and unexpected title issues can all add days to your timeline.”
Local market conditions play a significant role too. In hot markets with overworked professionals, you might experience delays simply due to the volume of transactions happening simultaneously.
What should I bring to the closing meeting?
When the big day arrives, being prepared makes all the difference. At minimum, you’ll need to bring:
Your government-issued photo ID is absolutely essential—without it, the notary can’t verify your identity and the closing can’t proceed. Make sure it’s current and matches the name on your closing documents.
You’ll also need your closing funds in the proper form—typically either a wire transfer confirmation (if you’ve already sent the money) or a cashier’s check made out to the escrow company. Personal checks usually aren’t accepted for large amounts.
“One small tip that’s saved many closings: bring your personal checkbook,” advises David Greiner. “Last-minute adjustments to closing figures are common, and being able to write a check for $37.50 for a minor prorated utility bill can prevent rescheduling the entire closing.”
Don’t forget a copy of your Closing Disclosure, proof of homeowner’s insurance, and contact information for all relevant parties. Having these items readily available helps address any questions that might arise during the signing process.
Who pays for title insurance and why is it needed?
Title insurance payment traditions follow regional customs that might surprise you. In Southern California, sellers typically cover the owner’s title policy, while in Northern California, this cost often falls to buyers. The lender’s policy, however, is almost always the buyer’s responsibility since it protects their mortgage company.
“These payment customs are just that—customs,” explains David Greiner. “Everything is negotiable in the real estate closing process, and the final determination of who pays what should be clearly spelled out in your purchase agreement.”
But why do you need title insurance at all? Unlike most insurance that protects against future events, title insurance safeguards you against unknown past problems. Imagine finding years after purchase that a previous owner’s heir claims ownership of your property, or that a decades-old lien wasn’t properly cleared. Title insurance covers the legal costs to defend your ownership and compensates you if you lose the property due to covered defects.
The beauty of title insurance is that you pay just once at closing, yet remain protected for as long as you own the property. For most homeowners, this one-time premium buys invaluable peace of mind against title nightmares that could otherwise cost tens of thousands in legal fees.
When you consider that title insurance protects what’s likely your largest investment, the premium feels like a small price to pay for securing your property rights against the unknown.
Conclusion
The real estate closing process represents the final chapter in your property ownership story. While it might seem like a maze of paperwork and procedures, understanding each step transforms what could be overwhelming into an exciting milestone.
Think of closing as the bridge between “almost yours” and “welcome home.” Having walked through each component of the process, you’re now equipped to steer this final stage with confidence.
Remember these essentials as you approach your closing day:
Preparation saves headaches. Gather your documents early, keep them organized, and respond promptly when professionals request information. This simple approach prevents the most common closing delays.
Communication keeps everything flowing smoothly. Regular check-ins with your agent, lender, and closing team help identify potential issues before they become problems. A quick text or email can make all the difference.
Thorough inspections and document reviews protect your investment for years to come. The few hundred dollars spent on quality inspections can save thousands in unexpected repairs. Similarly, taking time to understand what you’re signing prevents future surprises.
Always verify financial instructions through trusted channels. Wire fraud is a real threat that can be avoided with simple verification steps. That five-minute phone call to confirm wire instructions could save your entire down payment.
Don’t be afraid to ask questions about closing costs. Many fees are negotiable, and understanding what you’re paying for empowers you to potentially reduce your expenses.
At Greiner Law Corp, we’ve guided countless clients through real estate transactions, treating each one as the significant life event it truly is. Our approach balances legal protection with practical solutions, ensuring you understand both the risks and opportunities in your transaction.
“The most satisfying moment for me,” says David Greiner, “is seeing the relief and joy on clients’ faces when they realize the property is finally, officially theirs. That moment makes all the paperwork worthwhile.”
Whether you’re buying your first condo in Riverside, investing in rental property in San Bernardino, or selling your family home in Los Angeles, having experienced legal guidance can transform your closing experience from stressful to satisfying.
Learn more about contracts for sale of real estate
The real estate closing process isn’t just about paperwork—it’s about turning contracts into keys, agreements into addresses, and dreams into doorways. With proper preparation and the right team supporting you, your closing day becomes not just the end of a transaction, but the beginning of a new chapter.


